 Real estate photo editing process The popularity of real estate business is increasing day by day. Like other businesses, real estate photo editing business also needs to use photos to keep pace with other sectors. Photo editing process helps to make the photo pop up by eliminating the ill-side of the photo. Flawless photography is impossible for a photographer. When it comes to real estate photography, it become tricky than other photography genres. Without quality photo of the real estate business, the million dollar business's photo look so pale that create a negative sense. However, with the help of digital photo editing software, we can remove any kinds of imperfection from the photos. In this article, I am going to discuss how a professional photo editor follow the photo editing processes to edit the real estate photo. Real estate photo editing process a professional editor follows Remove the unnecessary objects from the photo The first thing the professional photo editor does is to remove the unnecessary objects from the photo. A small imperfection in the real estate photo can make the billion dollar business's photo blur that decreases the quality of the photo. Our professional photo editing team perfectly remove the unwanted objects from the background to bring the inner beauty of the real estate photo. Color correction Various reasons can make the real estate photo vivid-less. Lack of the natural light, ill camera setting adjustment can decrease the colorfulness of the photo. However, with the help of Photoshop hue/saturation, we can fix this problem by adjusting the exposure, lightness, and brightness of the photo. If you are not familiar with color correction, you can get a quote from us to get color correction service. Photo enhancement Photographing real estate is not an easy work. Even a professional real estate photographer makes mistake to shoot photo. Retouching on real estate photo can change the effect of the image and makes it eye-catching. Removing blemishes, add props, clear the blurriness, and make the real estate photo focus include photo enhancement process. Clipping Expert Asia is the best place to get high-quality photo retouching service at a cheap price. Sky replacement You can use the sunny, bright, and colorful sky instead of dull sky. It is very simple in Photoshop to change the sky which can make your real estate photo more appealing. Other necessary editing processes a photo editor follows
0 Comments
Background removal service is very crucial for product photographer who sells on Amazon, eBay etc. Also, need for graphics designer, photo editing agency, fashion designer, and online store. In this e-commerce business world, visual content like image is using as a powerful marketing tool for grabbing customer attention. In this case, every business use high-quality photo in their social platforms, and also on their website. Without high-quality image, it is impossible to get potential customer. The quality of an image depends on the background mostly. So, it is necessary to remove the background from the image and using a pure white background instead of the original background. Background removal service at Clipping Expert Asia Clipping Expert Asia is the leading photo editing company which provides world-class photo editing and background removal service at a cheap price maintaining quality. They have an expert and professional graphics designers who have more than 10 years of working experience in this related field. They offer high-quality background removal service. Cheap price is their main attraction. Follow advance photo editing process to remove the background. Sample works 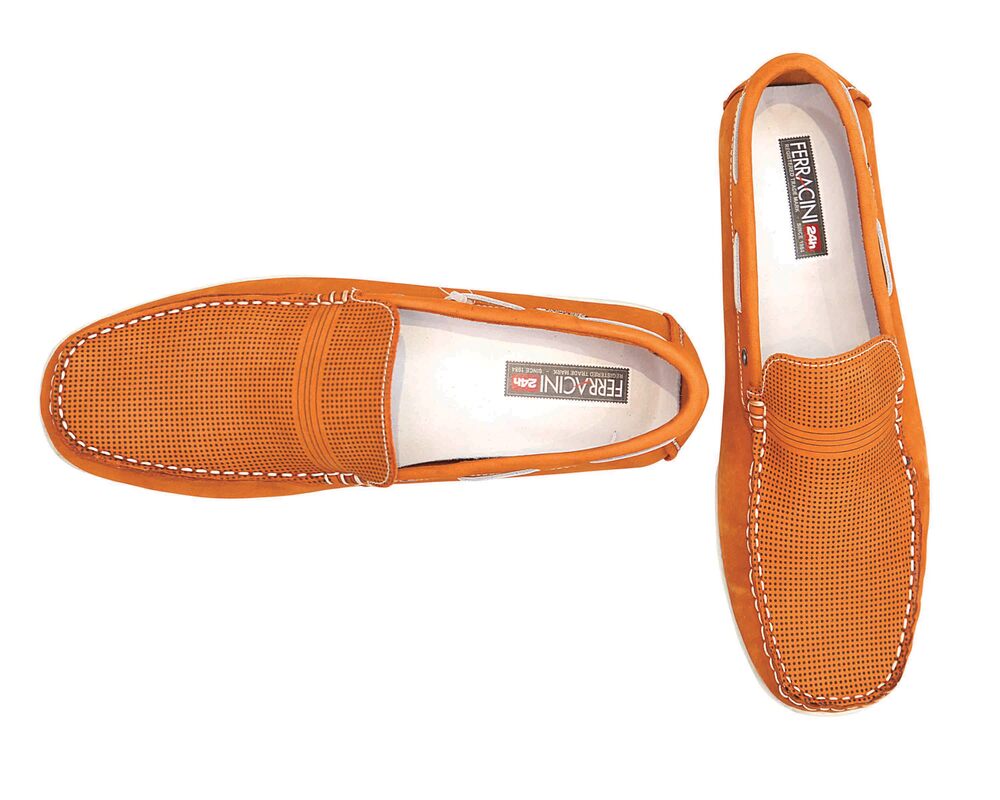   Background of an image can make the image attractive or blur. The quality of an image mostly depends on its background it used. We are the best photo editing company which provides high-quality background remove service at cheap price. Our main goal is to provide quality services which make our clients happy. We want to see the smiling face of our clients.
Who needs background removal service? See the below list who needs clipping path services. 1. Photographers 2. Online store owner 3. E-commerce business 4. Freelance graphic designer 5. Photo editing agency 6. Product photographer 7. Fashion designer 8. Magazines and newspaper 9. Small business owner Why we are the best? We have an expert photo editing team which consist of 40 people. They have more than 12 years of working experience in photo editing fields. Use latest photo editing software Quick turn around service Low price Connected with us: https://clippingexpertasia.com [email protected] Why ignoring background remove service will cost you time and sales in your business?
The internet introduces us to e-commerce business in 1991. In e-commerce business, using high-quality product photo is a must. Every e-commerce business is using the photo to lead generation of sales and traffic to their business. Without using product photo it is impossible for them to uphold their business in front to their target audiences. But if the product photo you use couldn’t meet the demand of your audiences, obviously you get nothing from there. And product photo editing service ensures the quality of the product photo by making the photos more appealing. A background of an image can manifest the best feature of your product to the eyesight of your audiences. It also focuses on the subject’s of the image accurately. That’s why it is crucial to take the background removal service for businesses to lead sales and traffic. In this article, I am going to cover why business need background remove service. Also, show you the negative impacts if businesses ignore clipping path service. The negative impacts of ignoring background removal service for business Make your product dull When a photographer shoots a product photo, there may be many unnecessary and wanted objects behind the background which can make your image blur or far away from the focal point. Background remove process helps to fix the imperfection by removing the background. In contrast, ignoring background removal service means to fall behind from your competitor. Decrease sales and conversation Almost all the online shopper likes to see at least 3 to 5 photos per product before buying a product. If the quality of the product photo can’t meet the demand of them, they never purchase anything from you. Though they can’t touch the product physically, they want to feel the same experience as they gain by shopping physically. So, you need to make your product photo pop up for increasing sales and conversation. To do that, you need to forward by going through post-processing method to enhance the quality of the photo. And background remove is the best method to make an image stand out. If you ignore this photo editing service, you will never effort to increase your sales and traffic to your website. Other shortcomings of ignoring clipping path services • Make your best effort fail to increase sales and conversation • Decrease your business popularity • Make a negative sense on the audience's mind about your product Why businesses need clipping path services? • Increase sales and conversation • Bring your business to the next level • Increase customer satisfaction rate • Give a realistic look to your product • Focus on the subject’s of the product • Make the product eye-catching and stand out • Remove distracting objects from an image Where to get clipping path services? In the web, there are thousands of photo editing service providers who provide professional background remove service at a cheap price. Clipping Expert Asia is one of the leading clipping path service providers in Asia which provides bulk photo editing and retouching service at a low cost. They provide high-ranked background removal service which helps you to increase sales and conversation to your website. Conclusion The e-commerce business is fully competitive and you need to take proper action to welcome this competition. A small change in your business strategy can bring your business to the next level. Use high-quality product photo which makes your business as a brand and helps to get more and more sales and traffic. In this case, photo editing services such background removes helps you a lot by improving the quality of your product photo. How to adjust white balance in Lightroom
What balance is made up with three elements- they are colors, temperature, and tints. Sometimes white balance may be confusing and may destroy the beauty of an image. In this tutorial, I am going to discuss about the way of fixing up the problem and show you the way how to adjust white balance in Lightroom. Adjust white balance using Lightroom Eye dropper tool Select the Eye dropper tool from the basic panel in Lightroom. Then, move this tool to a part of your image where the RGB values very close to each other. Find such kinds of part as your new targeted neutral. When you move the eye dropper tool over your image, a dialogue box will pop up with RGB values. If you have taken an eye in Navigator panel, you will see a preview of the white balance while you are moving the eye dropper tool. The white balance will not change until you click on it. I recommend you to take time for moving the eye dropper tool over your image to get the best white balance. Using Lightroom Preset option In all of the digital camera have the white balance option in where you can set the right one for your images. You can use flash, Kelvin, day light effect or others. If you want to set special effect, that will be cool. If you choose auto balance to use, that will be perfect. But after all the adjustment you make in your camera, but not get the right image when capturing a photo. Then, what do you do? Don’t be panicked, there are the same white balance in Lightroom like your camera balance. You can set the right one for your image from this option. You can choose any white balance preset for your image. Choose the right one which is perfect for your image. Conclusion It is easy to adjust white balance in Lightroom if you know the way how to do it. Fortunately, you get the right process in the above guidelines to do it efficiently. Follow the guidelines step by step and apply it in a practical way to correct the white balance in Lightroom. If you have not much time to do it, leave it for us. We have an expert team for doing this job. We provide bulk color correction service including correcting the white balance, clipping path, background remove and other related photo editing works. How to create and close path in Photoshop
 How to use paths in Photoshop
Photoshop is a mighty photo editing software for the graphics designers. It will be a beggar description to describe the feature of the Photoshop. Moreover, this photo editing tool becomes part and parcel in our everyday life who is graphics designer or photo editor. In this article, I am going to share how to use paths in Photoshop. Let’s have an eye in below guidelines to be a master user of paths. What are Paths? Photoshop is not a vector based photo editing software at all; however it offers some vector-based features. Now, it is clear that path is a vector based line drawing. A path is made when the numbers of line segment connected by each anchor points. Every anchor points are connected with each other. How do path works? There are a lot of advantages to use paths. One of them they will sharp and clean when you resized as they are vector based. Another useful feature is you can create your own unique shape by using it. By creating a unique path as path, you can use it in future if you want. Just save the path, and you can use it when you need it. How to use paths? There are a lot of advantages of using paths which help you to make your artwork professional and attractive. This is also used by the graphics designer to make a circle, precisely delete image background, and also use for stylizing text. Paths are also amazing for creating logos. Now, the question is how I can create a path in Photoshop. Photoshop made it simple. Follow the below guidelines to create a path. There are several ways available for creating path. They are: 1. With the pen tool You can create a path with the help of the pen tool in Photoshop. Just choose an image and select the pen tool from the toolbar. Then, draw lines with anchor points at the end. 2. With the shape tool You can turn any shape into a path by using the path option. 3. Create as a path You can create a path by using both of the pen tool and the shape tool. 4. Convert to path Photoshop allows us to convert any image, text even effect to path. Conclusion It is not a magic trick to create and use paths in Photoshop. Follow the above guidelines to create and use paths. Hope, this article will be helpful for you. If you need photo editing services, not forget to us. We have an expert team to do all kinds of photo editing work. Do you have any knowledge to create and use paths? Share your knowledge to us. How to add a vector mask to a layer in Photoshop
In Photoshop CS6, layer mask helps you to create soft edge mask. On the other hand, vector mask helps to create hard edge mask by creating vector path in a layer. The shapes you created by the help of vector path gives you smooth, clean and well designed edge. The shaped you created are never rugged as you create it by vector path in a layer. And you can easily move or edit the vector mask. In this content, I am going to discuss step by step how you can add a vector mask to a layer mask in Photoshop. Step 1 First, you should select the layer in the layer panel. Then, go to Layer Mask> vector layer> hide all. Remember, you don’t able to add a vector mask in the background. Step 2 Go to the Path panels and from the path panel choose vector mask layer. To go path panel, click window and then choose path. Step 3 Choose the pen tool from the tool bar menu. Or click C on the keyboard to get pen tool. You may also take any kind of shape tool if you want. Step 4 Make the desired shape from the vector mask you want. Now, you can see the conspicuous change inside or outside of the path. Inside of the path, everything is visible and outside of the path everything is invisible or masked. If needed, you can edit the path by the help of direct selection tool. I refer it above that you can’t add the vector mask to the background except layer mask. If needed, clicking double on the background, you can simply convert the background. Step 5 If you satisfied to see the result or the vector mask, save the file and close it. There is also another way to add vector mask in Photoshop CS6. For this select the layer you desired and paint a path by the help of pen tool or other shape tool. Then go to Layer> Vector Mask> Current Path. In this modern business world, digital marketing brings a revolutionary change in business. Every serious business use modern technology for promoting their business. If you have a e-commerce website, it is easy for you to get potential customer. We never count the importance of having an e-commerce website. As every things uses modern technology, customer now are not coming your physical store to place an order. They place an order on your website. So, make an e-commerce website and make it easy to use. In this way, you will get lot of orders for your online shop.
But all the benefits will be vain, if you don’t build e-commerce website. In this article, I am going to discuss how you can build e-commerce website for your business. Let have an eye to view the guidelines I provide in below. Design Probably the first and most important factor is make your website well designed. If your website not well designed and attractive, customer never come back your site. They never place a single order. On the other hand, if your site is attractive and well designed, they will get better shopping experience. Otherwise, your customer may be found alternative way. The success of your e-commerce website depends on best responsiveness. So, make sure that your e-commerce website is so responsive and support the consumers all time. So, make your website well designed and give the responsibility to on a loyal person. Product Picture The success of your e-commerce website depends on your product picture. Nearly 72% consumers want to show 3 to 5 images for each product before making purchases decision. So, provides eye catching product image in your website. Before upload a photo in your website, check you provide a photo with background removal. Obviously, the background color must be white. Security Security is another important factor that determines your e-commerce website success. Make sure your website is secure to use. It never hack consumer’s personal information such email. So, leave the security responsibilities on an expert web developer. Make it easy to use Make your website easy to use. Many people may visit your site and all the people are not guru. So make sure anybody use your website without any hesitation. Payment option Obviously, all your clients are not using same payment option. So, add lot of payment option for making easy for them to pay you. Otherwise, you will lose potential customer. SEO Make your E-commerce website SEO friendly. As a result, your consumers can visit your site and know what kinds of service you provide. For this, make sure you have an expert SEO team who will confirm that your e-commerce site is optimized. Search In every website has a search option bar. It helps the visitor to find any product or service easily. So, add a option bar in your website. In this way, you customer find your product easily and get better shopping experience. Open account on social media Every business target social media for promoting their business. So creates social media account for your business. Show your presence on social media. Tell your consumer that you are available on social media like Facebook, twitter and Instagram. Support Make sure that you have an expert team which supports the consumer for 24/7. When the consumer faces difficulties to use your website, your support team helps them effectively. Conclusion If you want to promote your business and get success from it, build e-commerce website. Without it, you never gain success. To build e-commerce website, follow the above guideline step by step. Hope you will build your e-commerce site by following our guideline. |
